If you’d like to see any photo larger you can right click and open in a new tab or window, or just click on the photo and it’ll enlarge the image and you can scroll through the photos with your arrow keys. Push escape to return to the blog page.

Monday, July 18, 2011

Fast portraits

This weekend, our community celebrated the Arts & Sciences with their annual da Vinci Days festival, and I was invited, along with other local artists to draw portraits at an art booth on site. It was a great experience working with willing models, happy to sit while we sketched quickly before they lost interest! The first day I worked with pastel pencils and a set of Hi-Fi Grays. I'd practiced on a couple self portraits at home the night before, timing myself, trying to complete a finished-enough portrait within 10 minutes. Though I didn't manage to keep under my imposed time limit, I headed off Saturday morning with my supplies, and did a few portraits before leaving to catch the Kinetic Sculpture parade.

Here's part of one of the portraits I finished Saturday - a bit distorted since it was laying on the table when I thought to take a photo.


Another artist that had been working with a ball point ink pen was just racing through his portraits, so that night, I practiced again, using a papermate profile black pen, working light and loose, pressing harder with the pen to add more detail once the "bones" of the drawing were complete.

Here are 3 of the portraits I finished and gave to my willing models Sunday:


This was a terrific experience and I wished I'd taken more photos of the finished portraits and the models on Saturday. There was a sweet little girl, about 4 years old that would only sit for a portrait if she was in her Daddy's lap. I had fun drawing the both of them, she sat surprisingly still! The little boy, above - the first ink drawing, was a squirmer --- though he requested we draw him, he kept sinking into his jacket, covering his mouth, chin, while his older brother sat still as stone right next to him. I was all set to draw the older boy when this little guy showed up & personally requested I draw him! He had fun taking his turn drawing the fella next to me once I finished. It was a good place to work, under a canopy during the multiple rain showers that dampened the festival, but didn't seem to discourage people from attending.

Thursday, July 14, 2011

Poppy Step by Step

Yesterday I had the pleasure of visiting one of the coolest nurseries in Oregon - Dancing Oaks Nursery with my friend Laurie. This nursery was the plein air Vista and Vineyard site for this week. We wandered the grounds, admiring and photographing the lovely flowers, then I settled down in a comfortable spot to paint one of the poppies. Once again, I was captivated by the intense reds, and a whole new variety I hadn't yet explored with pastel. This photo below shows the my preliminary drawing in red pastel pencil on a 12x12" primed and watercolored canvas I prepared ahead of time.


This next photo shows the first layer of pastel just before I sprayed the canvas with diluted pva size which helps adhere the pastel to the canvas. Behind the painting you can see my poppy model. This bed of poppies was just humming with bees!


This last photo shows my painting about 95% finished. After studying it for a bit I'll correct a few minor issues that are bugging me. As much as I adore this red, I'm sure this won't be the last poppy I paint this year... especially if I can get back out there before they're through blooming!

Tuesday, July 05, 2011

Fireworks!

After taking a firework photography webinar from creativeLive last Friday, I had to try out some of the tips and tricks I learned last night! Here are 12 of my favorites---right click and open in a new window or tab if you'd like to see any of them larger:


This one I especially love!!

Monday, June 06, 2011

From Start to Finish

This past weekend we painted a billboard.

Several of us from Portland, Corvallis and Eugene gathered at the Oregon Country Fair and started painting Friday. When installed the sign will be visible from highway 126, the coast highway connecting Eugene and Florence, on the property of the Oregon Country Fair. On Friday, the sign looked like what you see above. My daughter painted with us Friday and Saturday - above she's just starting to paint the top yellow border. When we arrived, the background sky had already been sprayed and the design had been "pounced" on top. ("pounce: a fine powder, often of charcoal, used in transferring a design through a perforated pattern.") The artwork was created by Justin Riede, a terrific sign artist that lives in Portland. He was basing his design on vintage fruit labels. If you'd like to see any photos larger, right click on the photo and open it in a new window or tab.

I'm helping to paint the top yellow border with my daughter (above) and another sign artist, Pat Carson is working on the lettering. In the photo below I'm working with both my daughter and my husband! How cool is that?!

The rest of the photos show the progression as more and more paint is applied, all without a lot of direction aside from the original colored in sketch. Many times we'd stand back and discuss what color might work here or there, whether a shadow was needed, was there a light source? (yes - top left) if so, then shadows needed to be related to that light source...

Below is a group shot of the painters on Sunday - my daughter is missing since she had to return to college to study for finals.


Here is Justin Riede, the sign designer/artist applying imitation gold leaf:


Below, Glen Hitzeman is painting some of the lettering.


Brad, my husband is shading the drop shadows.


José Solis, is painting some of the landscape. We enjoyed working together since we both have a looser painting style which compliments the other sign artist's linear painting style!


Here I'm on the other side of the sign from José.


The finished billboard! Truly a group project, sporting multiple layers of paint, aluminum leaf stars, glazed imitation gold leaf, a removable date panel, and lots of cooperative artistic talent. Look for it on hwy. 126 - it should be going up this coming Wednesday.

Thursday, April 28, 2011

DIY - How I Paint Leather Shoes

Several years ago I had a faded pair of lavender Birkenstocks which I decided I'd like better if they were a new color, so I pulled out my acrylic paints, and picked a favorite blue and proceeded to change the lavender to a dark, rich "Thalo" blue! This was so successful, I decided to take another pair of new lavender Birkenstocks and this time I painted them red. Below you can see the results of those do-it-yourself experiments.
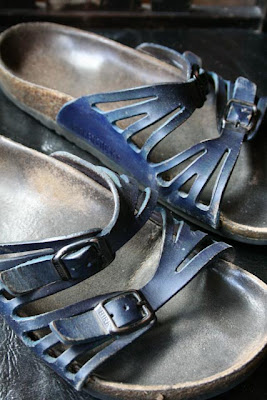


The other day, while shopping at Goodwill, I came upon a very nice pair of leather Haflinger clogs. They fit perfectly, but I wasn't that crazy about their color. Since they were so affordable, I figured I'd paint them a new color, like I did before with my Birkies. ---but first a disclaimer---if you're reading this and are under 18, go ask a parent before you start painting any of your shoes! If you're 18 or over, please, don't proceed if you're at all unsure about the process... I've been painting for years, and am willing to experiment and possibly ruin a pair of shoes in the process. If you'd be really upset if you've ruined your shoes by painting them, do not attempt this! I doubt it's reversible... Now with that out of the way, here's what I used, and a photo gallery of the process:

1. First off, take photos of the original, unpainted clogs:


2. Gather supplies---cover table with old papers - notice ad for shoes - how appropriate! I used Burnt Umber acrylic paint, water in an old carton, a carton lid for my paint palette, a palette knife & an inexpensive soft brush.


3. Use pliers to open old paint tube. Mix with water - realize paint is really old, and it won't mix, it just stays in a lump on the palette. Rinse off in sink, hoping it eventually dissolves in pipes... Find almost empty tube of newer looking Burnt Umber. Squeeze out another blob onto palette and mix with water and palette knife. Once you have a very watery bit of paint next to the main lump of paint, use your soft brush and start applying smoothly to shoe. I started with the back seam, and worked my way around to the front sewn panel, spreading the watered down acrylics, adding more water, more paint, and trying to keep a consistent amount and flow all around the panel. Work some paint over the edge of the shoe, where it goes into the foot bed, just over the seam.


4. Once the panel is covered as smoothly as you can, start painting the rest of the shoe, starting at the corner near the panel, and working fast but wet and consistent over the whole rest of the front of the shoe.


5. Stop to take more photos - showing the first painted coat on one shoe, next to the unpainted second shoe.


6. Start painting second shoe, working from the back seam around to the other side, covering the panel first. Work with a lot of water, making sure any lumps are smooth on the paint palette (lid) before applying to shoe.


7. Once panel is covered, paint the rest of the shoe.


8. When you've finished painting both shoes, check to see if the first shoe is pretty much dry. If it is, go ahead and paint a second coat. Again, use very thinned, watery acrylics. Do the same for the second shoe.


9. Let dry several hours, or overnight. Paint one more coat, again using a very watered down, thinned paint. It helps to keep everything wet in each section as you paint, smoothing with your brush to keep the layers of paint distributed over the whole section (like I did in the panel section, then the front shoe section, painting each separately). If the paint isn't thinned down ahead of time, it might streak, or leave spots where the paint is thicker. Some differences in way the paint soaks in creates some darker areas which are not easy to avoid, however I think this adds to the whole "distressed oiled" leather look.


10. When dry, wear happily!